If you’re thinking this doesn’t seem like an interesting topic with much to write about, you are wrong. There is a lot of detail in building placement in Age of Empires 2, making sure your collection buildings are positioned for maximum efficiency, placing your buildings defensively to act as walls and even building your military buildings in a forward position during aggressive plays so you can reinforce your army at the same rate your opponent does; allowing you to keep the pressure up without becoming outnumbered. All of these small things can result in a massive advantage for you in game so we’re going to look into a bunch of different scenarios and the best way you can place your buildings to gain the upper hand. Starting with economy!
Economy building placements, we’re about to blow your mind with some details about Farms you wouldn’t of even considered. Believe it or not when a Villager is harvesting food from a farm it does not walk around the entire area given by the farm, it stays within the green box shown in the diagram below. Knowing the villager will only walk within said box, if you keep that box as close to the Town Center as possible it will result in an increased food income due to a smaller amount of travel time. If we wanted to maximize this bonus by placing our farms in order of efficiency, you will end up with the below diagram. Farms labeled ‘1’ should be your first priority to build, the higher the number the farm the less efficient it will be.

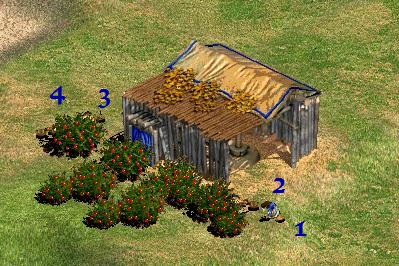
Away from the more interesting side of the mechanics and a little bit of a step towards logic for this one. The whole goal with your drop off placement is you want to minimize travel distance while increasing surface area for drop offs as much as possible. Keep that in mind when you build any of your drop off points and you’ll be in a good situation. If you also have a rough idea of how many Villagers you plan on having on a certain resource in future it will also help you reach that maximum efficiency. For instance, with our Berry Bushes we know we’ll be ending up with four Villagers collecting from them in most scenarios. To get this as efficient as possible we want to minimize all drop of times by reducing the amount of walking each Villager will be doing, knowing we will only be having four Villagers there means we can lose some of the drop off surface area to minimize movement time. Constructing a Mill as such on the Berry Bushes shown below will result in a highly economic return due to the next to no travel time spent by each Villager dropping of it’s resources.
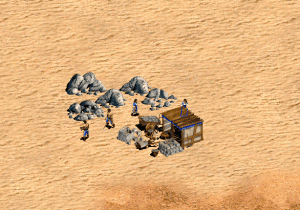
The same theory applies to all of your drop off points, from Lumber Camps to Stone Mines. As shown below we are still trying to maximize surface area to allow more Villagers to drop off resources without bunching up on each other and minimizing any travelling distance. The example below shows a Mining Camp which is place in quite a good spot, allowing Villagers to almost seamlessly drop off resources, should you however want to add more Villagers to the Stone it will become less efficient. In the second you will see where a more efficient Mining Camp could be placed to provide a space for many more Villagers to gather whilst also being extremely efficient.

Lumber Camps provide a bit of a different issue. As the resource you are gathering will constantly be changing shape due to depleted trees you to should constantly change your gather points. The biggest problem you’ll run into with your Lumberjacks is they will constantly bump into or trap each other, resulting in a lower income due to either idle time or increased travel time. To combat this you want to have your Lumber Camp touching as many trees as possible on creation to try and reduce the area for villagers to bump, or even get stuck in. Doing this will net you a little bit of extra resource because we all know and idle Villager is costing you resource income. If you want to take it a step further every now and then check in on your Villagers and make sure to divide them up among the trees around the Lumber Camp, generally if you have three Villagers on a single tree it will start to cause bumping issues, if you can divide them up more efficiently before the problem even starts you’ll be in a good spot.

When you start getting quite a few Villagers onto lumber as it is one of the most highly resources in the game it becomes a huge challenge to micromanage effectively, therefore a lot of people start creating extra Lumber Camps and split their Villagers between them. This will solve nearly all your issues as it will create less clutter in the area and gives a lot more drop off points allowing the Villagers to move more freely. Naturally as the forest deplete you need to create new Lumber Camps to combat the distance the resource is away from the drop off location. You want to be creating a new drop off point every 3-4 tiles of trees depleted and remembering to split across two or more Lumber Camps where possible.

These are all small tips, when utilized together over a period of an entire game it makes a big difference. Starting thinking a little more where you’re placing things and eventually you’ll start naturally making quick efficient decisions with your placement. All you need to do is create a habit of it and you’ll be squeezing the most from every second of resource gathering, which in turn will boost you far above what your opponent is capable of.
wow!